

To use a digital vernier caliper, first zero it out by closing the jaws and pressing the ‘zero’ button. Then, measure by opening the jaws to encompass the object and reading the display.
A digital vernier caliper is a precision instrument used to measure internal and external distances extremely accurately. The beauty of a digital vernier caliper lies in its ease of use and the instant digital readout. This tool has become indispensable in industries where precise measurements are critical, from engineering to jewelry making.
Understanding how to operate this tool correctly can enhance accuracy in measurements and ensure your projects meet the required specifications. With just a few simple steps, you can master the use of a digital vernier caliper, making your measurements more reliable and your work more efficient. Remember, practice makes perfect, and familiarizing yourself with the caliper’s functions is key to taking precise measurements.
Introduction To Digital Vernier Calipers
Digital Vernier Calipers are precision tools. They measure length, depth, and diameter. These calipers provide fast, accurate readings. They are easier to read than traditional tools.
Essential Features Of Digital Vernier Calipers
- Display: Large, easy-to-read LCD.
- Accuracy: Measures up to 0.01mm.
- Material: Stainless steel for durability.
- Data Output: Allows for data transfer.
- Battery Life: Long-lasting for continual use.
- Zero Function: Resets display to zero easily.
Advantages Over Analog Versions
| Feature | Digital | Analog |
|---|---|---|
| Readability | Clear digital display | Manual scale reading |
| Speed | Instant measurement | Slower, manual calculation |
| Accuracy | Highly precise | Subject to user error |
| Data Recording | Easy with output function | Manual recording |

Credit: makezine.com
Preparing For Measurement
Before diving into measurements, preparing your digital vernier caliper is crucial. This ensures accurate and reliable readings. Follow these steps for a smooth start.
Selecting The Right Caliper Size
Calipers come in various sizes. Each size fits different measurement tasks. Choose one that suits your workpiece. For instance:
- 6-inch calipers for small objects
- 12-inch calipers for larger projects
Initial Device Inspection And Calibration
Before use, inspect your caliper. Ensure it’s clean and free from damage. Follow these steps:
- Check the digital display is working.
- Examine the jaws and slider for smooth movement.
- Open and close the caliper to its full range. Confirm it returns to zero.
If the readout doesn’t show zero, calibrate. Refer to the manual for calibration steps.
Understanding The Display
Digital vernier calipers offer precision in measurement. They feature an electronic display. The display shows the exact measurement. It is easy to read. The tool eliminates reading errors common with analog calipers.
Reading Measurements On The Screen
Reading the digital screen is straightforward. Switch on the device. Notice the numbers on the screen. These numbers represent the measurement. The display includes a decimal point. This point increases accuracy. Units of measurement are also visible. They can be in millimeters or inches. Users can easily switch between these units.
Setting The Zero Point
Before measuring, setting the zero point is crucial. Open the caliper’s jaws. Ensure they are completely free of debris. Close them gently. Press the ‘Zero’ or ‘Origin’ button. This action sets the display to zero. This calibration step ensures accuracy. Now, the caliper is ready for precise measurement.
Measuring External Dimensions
Measuring objects with precision is essential in various fields. Digital Vernier calipers offer accuracy and ease. Learn to measure external dimensions with these steps.
Positioning The Caliper Jaws
Start by opening the caliper’s jaws. Slide them apart gently. Make sure they are wider than the object. Now, bring the jaws together. Ensure they touch the object’s sides.
- Open the jaws: Create enough space.
- Slide gently: Avoid damaging the tool or object.
- Touch the object: The jaws should lightly grip the object.
Locking The Measurement
Once the jaws are in position, it’s time to lock the measurement. Find the screw or lever on the caliper. Turn or slide it to hold the jaws in place. Your measurement is now secure.
- Find the lock: It could be a screw or a lever.
- Secure the jaws: Turn or slide the lock.
- Check the display: Read the measurement on the screen.
Measuring Internal Dimensions
Mastering the use of a digital Vernier caliper is essential for precise measurements. In this section, we focus on how to measure internal dimensions accurately. Whether you’re a seasoned engineer or a DIY enthusiast, understanding the correct use of the upper jaws will elevate your measuring skills.
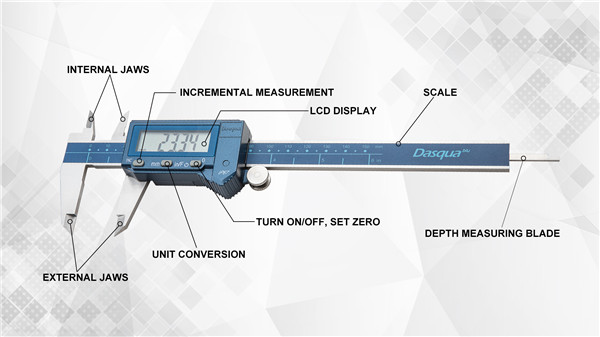
Using The Upper Jaws Correctly
Digital Vernier calipers come with two sets of jaws. The upper jaws measure inside dimensions. Follow these steps:
- Open the caliper’s upper jaws by turning the thumb screw.
- Insert the jaws into the space you wish to measure.
- Close the jaws gently until they touch the internal sides.
- Lock the screw to secure the measurement.
- Read the digital display for an instant measurement.
Always clean the jaws before use. This ensures that the measurements are precise.
Ensuring Accurate Internal Measurements
To get an accurate internal dimension, follow these tips:
- Zero the caliper before taking a new measurement.
- Keep the device perpendicular to the object.
- Avoid applying too much pressure.
- Use the locking screw to hold the measurement.
Calipers must be calibrated regularly. Check the tool’s manual for specific calibration instructions.
With practice, you can take quick and accurate internal measurements. Always record the measurement right away to avoid errors.
Credit: www.dasquatools.com
Depth Measurement Techniques
Measuring depth is a vital skill in many fields. A Digital Vernier Caliper makes it easy. This guide shows you how.
Utilizing The Depth Rod
Every Digital Vernier Caliper has a depth rod. It looks like a thin metal tail. Here’s how to use it:
- Open the caliper jaws. Slide the object between them.
- Find the hole or gap you need to measure.
- Push the depth rod into the hole. Make sure it touches the bottom.
- Read the measurement on the digital display.
Tip: Keep the caliper straight for accurate readings.
Tips For Consistent Depth Readings
Consistency is key for precise measurements. Follow these tips:
- Clean the caliper and object before measuring.
- Use a steady hand. A shaky hand can give wrong numbers.
- Zero the caliper. Always start from zero for each measurement.
- Repeat the measurement. Do it 2-3 times to be sure.
Remember, practice makes perfect. Keep measuring, and you’ll get better!
The Step Gauge Function
The Step Gauge Function on a digital vernier caliper offers precise step measurements. This feature allows users to measure different levels or heights of an object. Understanding how to use the step gauge correctly is crucial for accurate results.
How To Measure Steps
Follow these steps to measure using the Step Gauge Function:
- Open the caliper’s jaws by sliding the thumbwheel away from the body.
- Place the caliper’s end depth rod onto the first step you want to measure.
- Slide the main body of the caliper until the upper jaw touches the second step.
- Lock the caliper’s screw to hold the measurement in place.
- Read the measurement on the digital display.
- Record the measurement for your reference.
Avoiding Common Errors
Ensure accuracy by avoiding these common mistakes:
- Zero the caliper before measuring.
- Do not apply excess force when using the caliper.
- Keep the caliper clean and free of debris.
- Always double-check measurements for consistency.
By following these guidelines, the Step Gauge Function will yield reliable measurements for your projects.
Maintenance And Care
Keeping a digital vernier caliper in top shape is crucial. Proper maintenance ensures accurate measurements and extends the tool’s life. Follow these guidelines for care.
Cleaning Best Practices
Regular cleaning prevents damage and keeps readings precise. Use a dry cloth to wipe the caliper. Avoid harsh chemicals or abrasives. Remove debris from the jaws with a soft brush. After cleaning, apply a thin oil layer to prevent rust.
- Wipe after use: Use a clean, dry cloth.
- Brush the jaws: A soft brush removes particles.
- Avoid moisture: Store in a dry place.
- Oil lightly: Protects against corrosion.
Storing Your Caliper Properly
Proper storage is key for caliper longevity. Keep it in a protective case when not in use. Store in a cool, dry place. Avoid exposure to direct sunlight or extreme temperatures. Ensure the caliper is fully closed to avoid jaw damage.
| Storage Tip | Reason |
|---|---|
| Use protective case | Prevents physical damage |
| Store in dry area | Protects from moisture |
| Avoid sunlight | Prevents heat damage |
| Close caliper | Protects measuring jaws |
Follow these simple steps to ensure your digital vernier caliper remains precise and durable for years to come.
Troubleshooting Common Issues
Even the best tools can have issues. Our digital Vernier calipers are no exception. Let’s tackle some common problems you might face.
Dealing With Display Errors
Display errors can be frustrating. Don’t worry, we can fix them.
- First, reset your caliper. Look for a small reset button.
- If that fails, clean the jaws. Dust can cause errors.
- Check the slide. It should move smoothly.
If these steps don’t work, your caliper might need professional help.
Battery Replacement And Longevity
Your caliper’s heart is its battery. Here’s how to keep it beating.
- Turn off your caliper when not in use. It saves power.
- If the display dims, it’s time for a new battery.
- Changing the battery is easy. Open the back, swap, and close.
Note: Use quality batteries for longer life.
With these tips, your digital Vernier caliper will be ready for any task.
Advanced Tips For Precision
Mastering the use of a digital Vernier caliper takes practice. With these Advanced Tips for Precision, users can achieve more accurate measurements. These tips focus on fine-tuning and understanding measurement variations.
Fine-tuning Calibration
Calibration ensures your caliper gives true measurements. Follow these steps:
- Start with the caliper at zero. Check this every time.
- Use a standard gauge block to check accuracy.
- If readings are off, adjust the caliper according to the manual.
Remember, regular calibration maintains accuracy.
Interpreting Measurement Variations
Slight differences in readings can happen. Here’s how to manage:
- Temperature changes affect metal. Measure in a controlled environment.
- Pressure on the caliper can skew results. Use a gentle touch.
- Repeated measurements help verify accuracy. Always take multiple readings.
Understanding these variations improves measurement reliability.
Digital Calipers In Professional Use
Digital vernier calipers are precise tools in professional settings. They measure dimensions with accuracy. Experts rely on their digital displays for quick readings. These calipers serve in engineering, manufacturing, and science. They are vital for quality control. Their precision is unmatched in various industries.
Applications In Various Industries
- Aerospace: Crafting airplane parts with tight tolerances.
- Automotive: Ensuring engine components fit perfectly.
- Manufacturing: Checking product dimensions for consistency.
- Electronics: Measuring small electronic parts with precision.
- Medical: Crafting medical devices for patient care.
Case Studies Of Precision Measuring
| Industry | Challenge | Solution | Outcome |
|---|---|---|---|
| Automotive | Engine part required exact sizing. | Used digital calipers for measurement. | Parts fit seamlessly, boosting performance. |
| Electronics | Needed to measure microchips. | Digital calipers provided micron-level precision. | Increased product reliability and customer satisfaction. |
.gif)
Credit: megadepot.com
Frequently Asked Questions
What Is A Digital Vernier Caliper?
A digital Vernier caliper is a precision instrument used to measure internal and external distances accurately. Its digital display provides readings in various units, enhancing measurement ease and accuracy.
How To Read A Digital Vernier Caliper?
Reading a digital Vernier caliper is straightforward: simply close the jaws, zero the display, and then measure by opening the jaws to the target. The digital screen will show the exact measurement instantaneously.
What Measurements Can A Digital Vernier Caliper Take?
Digital Vernier calipers can measure internal and external dimensions, depth, and step distances with high precision. They are versatile tools for detailed measurement tasks.
How To Zero A Digital Vernier Caliper?
Zeroing a digital Vernier caliper is done by closing its jaws completely, ensuring they are clean and making sure the reading is at the zero point before starting any new measurement.
Conclusion
Mastering the digital vernier caliper is a skill that enhances precision in various projects. By following the steps outlined, you’ll measure with confidence and accuracy. Embrace this tool to elevate your craftsmanship, ensuring measurements are always spot-on. Remember, practice leads to perfection.
Keep measuring, keep creating!
